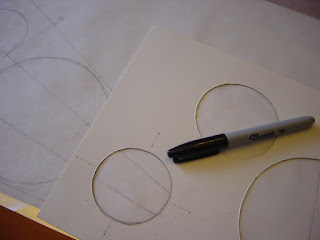
What to do when a pattern calls for pre-cut cirlces and they are not available. One could use dies to cut the fabrics. Rulers to cut circles are helpful, or one could create a stencil with card stock to create the circles.
Also create a second set of circles, larger than the main fabric for the muslin circles.
Then trace the circles onto the wrong side of the fabric and cut them out.
The colour circles cut out.
Creating two sets, one of colour and the slightly larger ones in muslin.
Place the two circles together, right sides facing inwards.
Draw the stitching line on the back of the muslin, pin the two circles together and stitch on the drawn line.
The stitched circle.
Trim the excess fabric with a pair of pinking shears, this helps to keep the circle round, when turning inside out.
Using the slit on the back, turn the circle inside out.
Placement on this quilt is key. Getting everything perfectly aligned in a circle is very important.
Due to this, I created a paper layout plan, which I drafted from scratch.
This is how to create it:
Draw one pie piece, then using my original stencil, I work out where the circles will fit.
Once I have the placements, I can now move on to the next step. Making my larger pie stencil.
Trace over the pencil lines with a Sharpie. I place a sheet of foil from the kitchen under my paper, to prevent any Sharpie art from being left behind on the table. The kitchen is a treasure trove of invention for quilting.
I used an old tool. This is a dressmakers tracing wheel. Once I place my cardboard underneath my paper pattern I used this to transfer the design to the cardboard.
It will look like this.
Then using the transfer as a guide, trace with a Sharpie. Then cut out the circles and the pie shape. This is the stencil to use for creating the layout.Using a large sheet of paper, trace the complete layout on the paper. Then make it more visible, by tracing over it with a Sharpie.
Next I placed a clear plastic tablecloth on top of paper layout. Then my white background, once it was in the center I could place all my circles on the background.
Then I used Roxanne applique glue and glued each piece in place.
To make sure I got no glue on the table or my paper pattern, the plastic tablecloth protected both.
When it came to placing my orbs or circles, it took me less than twenty minutes, preparing the paper layout first, was the best course of action. Especially with a white background fabric.
When sewing with white fabric, to keep it pristine white, wash your hands every half an hour. This prevents any of the natural oils from the skin to transfer onto the fabric. The white is unforgiving, worth the end result, as it looks clean and fresh when it is finished.


Oh wow Maggie great tutorial on your quilt build up it sure has made for perfect alignment on the lay out and given you a beautiful fun quilt top. Thanks so much for the step by step photos made it so easy to follow. I love circles so this really appeals to me. Also makes a great colour wheel for helping deciding on colours to use. Hugs Glenda
ReplyDeleteWhat great tips - thank you! I love the precision that you've achieved!
ReplyDeleteWow this is amazing, I love the circles :)
ReplyDeleteHi Maggie! WOWEE - this is beautiful. Sometimes going old school with the paper circles works just fine. I just did that same thing for the template for my spiral quilt. I needed a smallish circle to start it off - so paper and tracing around an object worked just great. ~smile~
ReplyDeleteRoseanne