Monday, 16 October 2017

A wedding project.....


Helping make someone feel extra special on their wedding day, it is a priviledge to do so.
This is the fabric and pattern.  Working on a sun dress at the moment, to practice my  dress making skills again.
Knitting is another skill I am learning, knitted a row of holes, then I discovered I missed one step, so my row looked right, but it was missing one step, all the knit stitches between each hole.  So I had to start over.
Bargello:
Step 1. Trimming off the sides.
Step 2. Cut fabric strips, in the sizes according to the pattern, to create the new strips to make the rows.
Step 3. Create row number one.
 Joining the pieces together to create the new row.
Step 4. Make row number two.
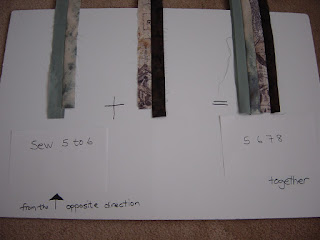
Step 5.  Take the first two rows to the ironing board, iron the strips in opposite directions.  This is done to make them easier to sew together and for the seams to lock.
Step 6.  Sew the first two rows together.
Step 7. Iron open towards row number two.
Step 8. Sew one of the side borders to row number one, it helps to stabilize row number one.
 This is what the back should look like.
The finished set.  Now continue to create rows three to thirty five, until the top is done.  Ironing towards the next right, until completed.


Wednesday, 4 October 2017

The Turn around...


The trees are changing colour and here in Canada,  Thanksgiving is almost here.
 365 Challenge got a few more blocks, found a few I had made, which was picked up and ended up with another project.


Anna and Linda,  at The Sewing Cafe, are inspiring a new group of quilters, who are making their first quilts.
 A lot of florals, which was a surprise.  The blocks all laid out, ready for assembly.
 The pattern they are using. 
 A Sunny and Happy Name for a Pattern.

Bargello.
Step 1. Find the center, pin number one to number twenty.
Step 2. Pin the layers together, from the middle to the outside.
Step 3. Stitch together, using a quarter inch foot.
Step 4. Heat set the seam, iron to one side, then turn inside out. Then Iron the seam again.

Christmas Beanies.
More slouchy hats, this is the one with the leftover bits.  It has a pompom on the top.  The cat just wanted to take off with this ball of fun.           
 Found two more colours of yarn, both will become beanies.
 The yarn has something sparkly in it, so it will definitely not be a guys hat.
Have a wonderful long weekend!


Wednesday, 27 September 2017

Boy, oh boy! Has it been hot.....

 The first week of Autumn/Fall arrived with a blast, of heat.  It has been very hot, making up for the below seasonal summer.  My tomato plants decided, to produce more fruit, the parsley plant seem to have grown inches overnight.  Even the plants think they have the wrong growing season.  With all of this happening, we did our walk/run for our local hospital to raise money to buy more digital imaging equipment, which it needs.
The heat was not going to stop us.
 As part of Christmas gifts, I was asked to make more Beanies. They are made with a loom and use thick acrylic wool.
Decided to use up leftovers from a few hats, from last year.
LE, a few more stitches was added to the hearts.
 The Bargello Class:
This week it is all about sewing the strips, together, from the bottom to the top.
Step 1.
Step 2.
Step 3.
Step 4.
Step 5.
 Step 6.
Step 7.
Step 8.
 Step 9.
 Step 10. This is the end result.


Wednesday, 20 September 2017

The T-Bag.

This is one of those bags, which is as the name suggests, is a T.  This is the shape of the pattern.  It is a good way to use up squares of fabric scraps.
 Use iron-on interfacing, it can be a light weight one.
Cut two and draw the squares on the interfacing, these will be placement for the squares.
 Once the squares are in place, fuse them to the interfacing.
  Creating two T's for the bag.  They can be match or be as scrappy as you want them to be.
Next,  fold the first row of squares, back over the row of squares, right next to it.  Right sides together, then sew these two rows together.  Do this until all the vertical rows are sewn.
Next pin the horizontal rows and stitch all of those rows.
 This is the main body of the bag.
 Cut two layers of batting, for the main body.
Cut two layers of lining for the main body.  Layer them, with the batting sandwiched in the middle, right sides of the fabric showing to the outside.  The same way you would sandwich a quilt.  Then quilt the three layers, together.  Do both T's for the bag. Then stitch binding to the top of both T's.

Next do the front and back pockets for the bag.
This bag has machine embroidered pockets on the front and the back of the bag.
Layer the embroidered pockets on top of batting and the lining.  Then quilt these pockets. Also stitch binding at the top of the pockets.
Once they are quilted, trim them to fit the narrow section of the T.  Next sew them to the main body of the T on the narrow T section.  The bottom of the pocket is sewn down, right where the narrow section becomes the large part of the T-section.

Layering, the two T's on top of each other, right sides showing to the outside. Then stitch three sides of the centre nine patch on the large Top section of the T, creating a U-shape. Then turn the side flaps towards the front and back on the sides and attach.
 It should look like this, with the squares showing on the outside.
 Cover the raw edges, on the sides with binding.  Stitch on handles to your main bag and your bag is done.